Tuesday, December 9, 2014

Attaching Pieces to a Hat Seamlessly

I'm not sure about you, but I'm not a fan of being able to see my stitch work resulting from attaching separate crochet items together.  I have also found that after normal wear and tear of character hats, that over time a running stitch becomes loose, thus leaving certain pieces (eyes, mouths, etc) to pull away, and kind of hang off of the hat.  That to me is very unattractive, and decided to find a better way to attach separate smaller pieces to a larger piece more efficiently, and seamlessly.

I have used the mattress stitch for attaching blanket squares together for a seamless look, and thought I could use the same stitch concept to attach pieces/appliques to a larger item. After countless failed tutorial searches for attaching together crochet pieces using the mattress stitch, I did the only logical thing I could think of - I created my own way to use the concept of the mattress stitch to attach smaller crochet pieces to larger crochet pieces. The one catch was how do I make it Truly seamless, where my stitch work won't show through on the inside/backside of the item? The answer: work Through the larger piece's completed stitches when attaching the smaller piece to it.

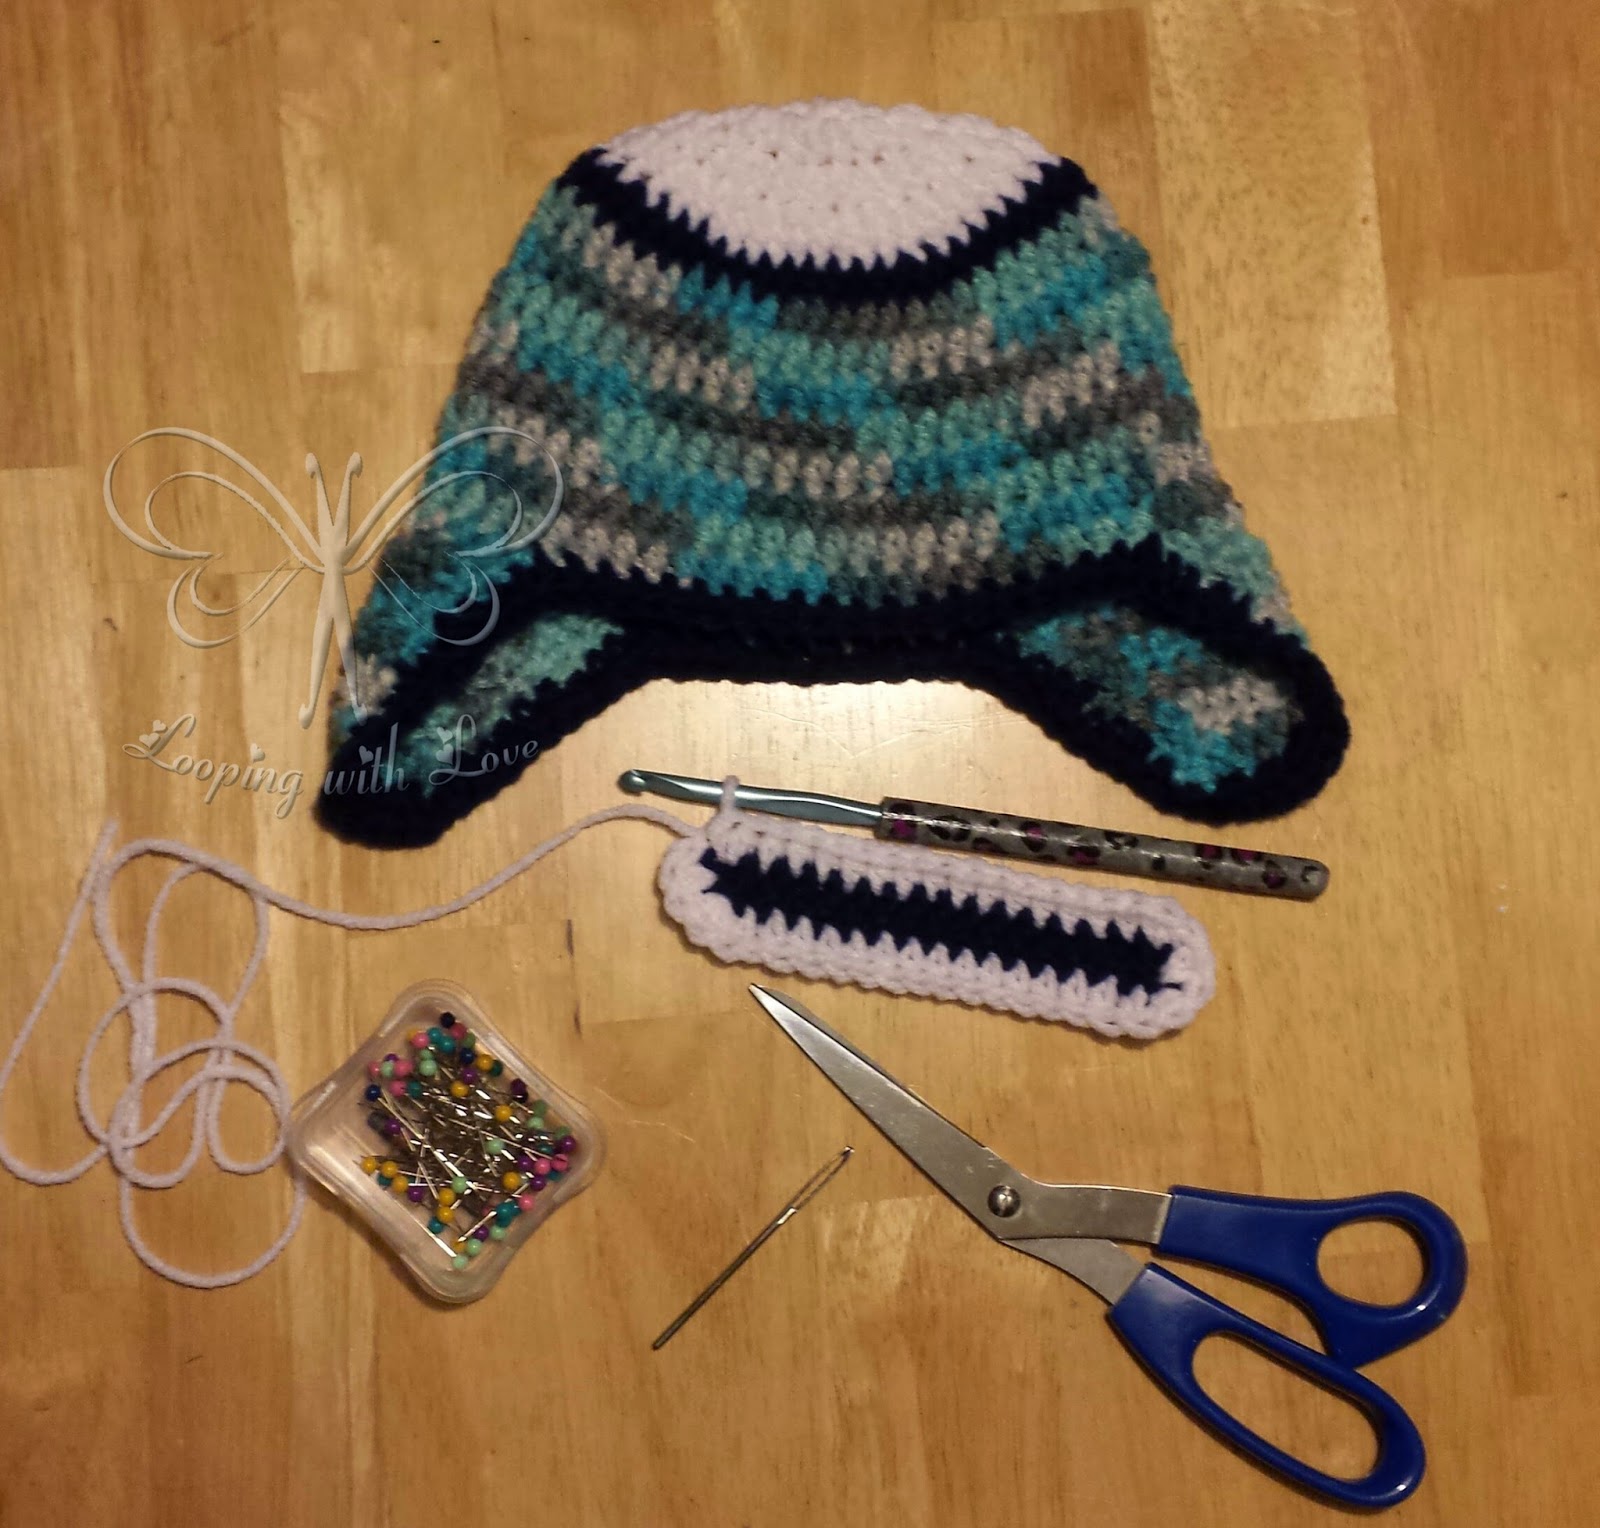
Let's get down to How to attach facial features to a character and/or animal hat. The tutorials below show  how to use the mattress stitch to attach flat pieces on top of each other, but you can use the same stitch concept to attach 3D pieces as well. If your 3D piece is an ear, then work the stitch down the front And back side of the same stitches on the ear. That way your ears will stand straight out/up, without the need to double up your crochet ear pieces to make them "stiff." This is how I attach all of my ears on hats ;-)

Materials Needed:
  • A Completed Hat
  • Smaller facial features to attach
  • Tapestry Needle
  • Long Ball Point Pins
  • Scissors

Next you'll need to complete your facial features with an Invisible Join.  I have a quick photo tutorial below of how to complete this seamless join, or you can Watch my video HERE.


Once your piece has been closed up with an invisible join, then you'll have to pin your piece in place to where you'd like it to be on your hat. (I have used yellow long ball point pins to attach this sock monkey's mouth onto the hat.)


Now the mattress stitch is done in about 5 steps for each stitch you'll be securing to your hat. (For this demo, it'll be every single white half double crochet stitch of the sock moneky's mouth.) 5 steps per stitch may sound like a lot, but once you get the hang of it, it goes rather quickly. 

First, you'll be starting in the stitch to the Right of where your working end is currently coming out from (photo 1). Slightly lift up the piece you're attaching, and slide your needle under 1 piece of yarn from a completed stitch of your hat. This technique is now working through the completed stitch from the hat, and Not working straight down through the hat's stitches, into the inside of the hat, and back out again (photo 1). Now you'll Skip over the next stitch (the one where your working yarn is coming from), and slide your needle under the top loops of the next stitch to the left from the outside of the piece in (photo 2). You just completed your initial attaching stitch :-) Now the rest of the attaching stitches will be worked as follows:
Insert your needle in the stitch to the right of your working yarn from the inside of your piece out, and while slightly lifting up the edge of the piece to be attached, slide your needle through the middle of a completed stitch of the hat (photo 3). Now skip over the next stitch (where your working yarn is coming out of), and insert your needle under the top loops from the outside of the piece in in the next stitch to the left (photo 4). Tug on the working yarn (the yarn piece in the middle) to make sure the facial feature is as close to the hat as possible (photo 5).  Then pull the end of the yarn (the yarn piece all the way on the left) until the gap between the facial feature and hat is gone (photo 6). 

Continue repeating the process of photos 3-6 for every stitch around your facial feature, while minding your pin points.


Once you have completed the mattress stitch for every outside stitch of your facial feature, remove the pins you used to secure the piece in place. Now you'll need to fasten off your tail. Again, this method of securing the tail is worked not only through stitches, but underneath the facial feature stitches and above the hat stitches.

First, slide your needle through the middle of the outermost stitches of your facial feature (photos A & B). Now, you'll be doubling back over stitches to secure your work; your needle needs to go back underneath a few stitches you just went through the middle of, being careful to not snag or go through the hat stitches (photo C). Go back through the middle of the stitches that you just went underneath of (photo D). Then work your needle to go back underneath a few stitches you just went through the middle of, being careful to not snag or go through the hat stitches (photo E). Then finally slide your needle through the middle of the very first stitches you went through (photo F).  Then hold the tail taught, and snip off any extra yarn.


Your attached facial feature should now be completely flush with your completed hat.


When you look on the inside of the hat, you shouldn't see any of your attaching stitch marks.


I hope this tutorial has helped you, and made attaching smaller crochet pieces to a larger crochet piece a tad easier. Please share with me any completed items you've made using this technique!

Happy Hooking :-)

Here's the finished sock monkey hat :-)
(the ears were attached with the mattress stitch in the front and then the back of 5 stitches of the ears to the hat.)


Monday, December 1, 2014

Cyber Monday

Cyber Monday 2014!

I first must apologize that I neglected to make blog posts about my Black Friday and Small Business Saturday deals. But my neglect means BIG SAVINGS for you!!!  So for Cyber Monday, I decided to do a combination of sales, and having a big blow out on patterns And orders (crochet and/or clay)!!

So without further adue, 


Make sure if you're taking part of the BOGO sale for patterns in my Ravelry, that you enter the code: CYBERMONDAY14, Before checking out; otherwise customer will be charged the full price of the pattern. Buyer's failure to use the code prior to checkout will not result in a refund at seller's expense.Sale ends 11:59pm CST on Dec 1, 2014. 


I'd love to see what pattern you choose to make! So make sure you Add your Project on Ravelry, so I can see your beautiful work and add your project to the pattern page!


Happy Hooking :-)


Friday, October 10, 2014

National I LOVE Yarn Day!

Today is National I Love Yarn day!

To celebrate, I decided to make ALL my patterns in Ravelry 
50% OFF, ALL weekend long!


Just go to my Ravelry Shop, add the pattern(s) of your choice to your cart. Click on "use a coupon code," then 

Use code:
LOVEYARN

to get 50% OFF!


Sale ends 11:59pm CST on Oct 13, 2014. Customer is responsible for entering coupon code LOVEYARN before checking out, otherwise customer will be charged the full price of the pattern. Buyer's failure to use the code prior to checkout will not result in a refund at seller's expense.


I'd love to see what pattern you choose to make! So make sure you Add your Project on Ravelry, so I can see your beautiful work and add your project to the pattern page!


Happy Hooking!

Friday, October 3, 2014

*New* Skull and Crossbones Applique

It's Finally October, which means it's Fall and Halloween is around the corner!


So I decided to do some digging through my notebooks of scribbled down patterns as I went for custom orders.  I get many requests or this and that, and after posting said custom order to only have a new customer want the exact same thing - I learned to write the pattern down as I was creating. Little did I know at the time that I was a designer in the rough, and that I've literally been designing for over 4 years now, but just recently started to have my patterns tested and released into the crochet world. So with the holidays soon approaching, I browsed through my pass orders and patterns in notebooks.  Considering Halloween is my Favorite holiday, I was SHOCKED that I Only had a Jack Skellington hat available in my pattern shops! So that needed to change like yesterday!

So I decided to release not 1 BUT 2 Monster Hats!  I'm currently working on a "build a monster" e-book pattern - where the customer can pick and choose which features to add to their hat! I hope it turns out as awesome as I imagine it in my head!  If you'd like to see my monster hats already available, then check out this blog post about my Big Eyed Monster Hat, or check out my Scary Cute Monster Hat pattern ;-)

But THEN I remembered that I have a skull, and a skull and crossbones applique that can be add to ANYTHING!  So right then and there I knew THAT was my next pattern to release.  
It is my pleasure to introduce: Skull and Crossbones Applique
Now this pattern is a 2 for 1!  You can work the applique with OR without the crossbones :-)


Here's a few items I have made for previous orders using this applique:


A Child Size "Pirate Hat" 

complete with a multicolored mohawk, earflaps, and tassels


Baby Skull Scalloped Hat

1st skull applique I ever created,
done custom per request of customer


Newborn Biker Photo Prop

This was a fun one to create!
Believe it or not, but the Mom tat and the name are really dried hot glue that I painted on top of, then hot glued to the vest!


I sent out the pattern to testers. I LOVE how the neon green one turned out!  Didn't they do a great job?


As a Thank you to my fans, I'm having a Sale ALL WEEK LONG for my new pattern!  
Use code: SKULL 
here to get $1 OFF during Oct 3-10, 2014! 

Sale ends 11:59pm CST on Oct 10, 2014. Limit of ONE coupon use per customer.  Customer is responsible for entering coupon code SKULL before checking out, otherwise customer will be charged the full price of the pattern. Buyer's failure to use the code prior to checkout will not result in a refund at seller's expense.


I'd love to see what you add your skull applique to! So make sure you Add your Project to Ravelry, so I can see your beautiful work!


Happy Hooking!

Saturday, September 27, 2014

Halloween is Upon us!

I don't know about you, but Halloween is my FAVORITE holiday!  It's probably because I originally come from Massachusetts, and up there they take the holiday very seriously.  Not until I was relocated after becoming an Army wife did I find out that there were places that had trick or treating curfews, and safe Halloween events. What?!  You're telling me I can only take my kid around during such and such a time on this designated day?  That drove me a tad insane. Cause you see, in MA, kids don't even Start trick or treating until it's dark, and if there's a front light on at 11pm, then you better still have candy to hand out to trick or treaters.  Almost everyone in MA goes all out for Halloween - decorations galore, spooky music blaring, fog machines turn on high, props set up on zip lines, driveway haunted houses - pretty much anything that can go "bump in the night" will most likely be betrayed on all hallow's eve. So it was a HUGE culture shock to be thrown into a military town in Texas where most parents take their kids to safe Halloween events at civic centers, or trick or treat during the hours of 6-8 pm, and only like 5 houses (if that) are handing out candy on every street. This is NOT my idea of Halloween!  I'm almost fairly certain that next year I want my daughters to experience what Halloween should truly be like, and we'll make the almost 2,000 mile trip to Grammie's house for that experience.

Anywho, back on topic!  So Halloween coming soon means I'm in the mood to punch out more Halloween-ish patterns!  This week alone I have released 2 monster hats, I'm adding photos to a Skull and Crossbones Applique, and a "build a monster" hat is in the works :-D  What better way to celebrate a New pattern release then give my fans a chance to win a FREE copy of my pattern?!  Well....how about 3 Free Copies of my new pattern!  [scroll down below for the rafflecopter to get your entries in ;-)]

Now here's a look at some amazing photos of my Big Eyed Monster Hat!


Didn't my testers do a Fabulous job?!


Here's your chance to WIN a FREE COPY of this pattern! Just simply click on the options in rafflecopter to get your entries in. 

Good Luck!


a Rafflecopter giveaway

Friday, September 12, 2014

Happy International Crochet Day!

Happy International Crochet Day Everyone!!!!

What better way to celebrate this day, then with a sale?! Well how about a DOUBLE WHAMMY???  Not Only am I having a sale on my patterns in Ravelry, but I'll also have a sale on Any order made now (Sept 12, 2014) through Sunday night (Sept 14, 2014) til 11:59pm CST!


So head on over to either my Facebook Page to place an order for any crochet item, or an order for stitch markers/clay covered handles.

OR

Head on over to my Ravelry store, and use coupon code: LOVECROCHET at checkout.


EITHER WAY, YOU'LL BE THE LUCKY ONE GETTING 30% OFF!


Happy Hooking :-)

Friday, September 5, 2014

G+ ruined my Scavenger Hunt!

So, I recently had a Scavenger Hunt on my blog (and eventually also my facebook page) for my fans.  Not until after 2/3 into the hunt did someone notify me that no matter how much they tried they couldn't leave a comment on my blog. Stumped as to why, I decided to log out of my Google account, and try to comment on my own blog without a Google account. Guess WHAT?!  I COULDN'T DO IT EITHER!  Every time I tried to comment, a new web page would pop up wanting me to sign into a Google account to continue.  But I THOUGHT I had my blog set to public so everyone could see my blog and comment freely (well, within reason).

So oddly enough, I turned to Google to search for "How to disable G+ comments in Blogger."  Luckily, many others have had the same issue, and I stumbled across a photo tutorial on how to fix my problem. But while reading that tutorial I learned Another new fact about linking your G+ to your Blogger.  This little factoid is a MAJOR PROBLEM FOR ME!  You see, the way it was set up was that anyone with a G+ account (but not anyone else) would be able to comment on the blog. That was the first blow. The second blow came when I learned that even some G+ account holders would be able to comment on my blog, but I wouldn't be able to view their comment due to their personal settings in G+.  SAY WHAT?! You mean that because I'm not in that person's G+ circles allowed to see their comments, that I can't see what they comment on MY OWN BLOG?!  Yup, you read that right!  If a G+ user didn't have their comments set to public for viewing, then there was NO WAY for me to know that they even commented on my blog!  So thanks G+ for any ghost posts that I may have missed!

After learning all of this, I have a few things to say: 

First off, I'M SORRY TO ANYONE THAT COMMENTED ON MY SCAVENGER HUNT, AND I COULDN'T SEE YOUR COMMENT BECAUSE OF THE SETTINGS THAT WERE ON DURING THE HUNT!!!!

Secondly, THE PROBLEM IS FIXED NOW!  I disabled G+ comments for my blog. So now ANYONE can comment on my blog :-)

Thirdly, I WILL HAVE ANOTHER SCAVENGER HUNT IN THE NEAR FUTURE TO MAKE UP FOR THIS BLUNDER!


I'm so Glad that I now know why my scavenger hunt was viewed over 80 times, but yet I only had 3 visible comments on my scavenger hunt to me.  I'm happy now that my settings are back to how they should be, thus letting any fan be able to comment on my blog :-)


IF by chance you have a Blogger account of your own and you want to make sure your G+ comments are disabled, then just look to the 2 photos below. It's only 2 steps ;-)


Madly Mahvelous Scavenger Hunt

Are you ready for a Scavenger Hunt???
HUNT IS NOW CLOSED; THANKS FOR PLAYING!

Here's what you'll be playing for:


Here's how it works:

There are 8 questions below that are all worth different amounts of points. Each question pertains to a different topic, and can be found on various sites that Looping with Love can be found; such as on my blog, my Ravelry Shop, my Facebook Page, my Craftsy Shop, my Pinterest, and my fb group: Looping Crazy for a possible 35 points!  

Now some questions are easy to answer, others are giving you a task to complete, and there's a few that you'll need to do some investigating, but I hope you enjoy the hunt!  

Once the scavenger hunt is closed (7 pm CST, Fri Sept 5, 2014), I will look to see if there's a clear cut winner having the most correct answers, thus having the highest points earned. If by chance there is multiple entries with the same amount of points earned, then I will then use a random pick generator online to choose the winner.

Simply comment below with 1-8 (so I know which question you're answering, and how many points to award a correct answer) and then your answer.

So, Here We GO! Good Luck!!

1.) What is the full name of the pattern that is dedicated to my late father? (5 pts)  

2.) How many patterns are listed in my Ravelry shop? (4 pts)  

3.) What was the first crochet item I made my daughter that kick started Looping with Love? (5 pts)  

4.) Post a link of your favorite item I've made on my facebook page; whether it was a completed order, or an original pattern. (4 pts)  

5.) Repin one of Looping with Love's pins, and then post the link of your pin. (5 pts)  

6.) What # baby am I currently pregnant with? (3 pts)  

7.) Do I have the same number of patterns released in both my Ravelry and Craftsy shops? (5 pts)  

8.) Join my crochet facebook group and introduce yourself! (4 pts)


**IF YOU CANNOT COMMENT ON THIS POST, THEN PLEASE GO TO MY FACEBOOK PAGE TO COMMENT ON THE PINNED POST THERE! It's been brought to my attention that blogger has been giving some issues to some, so I made the hunt available on my facebook page: Looping with Love**


Again, comment below this blog post with your answers. The highest points collected by 1 participant Wins! You're not required to have a blogger account to comment below either.


THE WINNER OF 3 PATTERNS OF CHOICE FROM MY RAVELRY SHOP IS:

Congratulations Rita!


Don't forget to make sure you enter the for the Grand Prize at: Here at the Mad Mad Makers blog!

Thursday, September 4, 2014

Madly Mahvelous Scavenger Hunt & Giveaway

Have y'all been watching the AMAZING 23 vendor giveaway happening on Mad Mad Makers? If not, then don't worry - you still have time to be a part of some vendors' scavenger hunts, and the HUGE Grand Prize giveaway!  The photo below shows all of the Fantastic Mad Mad Makers that are taking part in this extravaganza!


Prizes include: wonderful crochet patterns, exquisite clay items, yummy smelling soaps and lotions, and amazing gift certificates!

So you may be wondering what do you have to do to win?  Well, each day until Sept 7th, there's a few ways to win! Vendors have their fans search on various pages (facebook, blogs, ravelry, craftsy, pinterest, etsy) for either a photo with the stamp below, or answer questions. The fans report back with their answers in the comment section for their entry on that vendor's page. Then the vendor selects a winner randomly through random.org, woobox, etc. when their time slot has closed.


Second way to win is entering for the GRAND PRIZE!  Now this is pure Madness, but would you expect anything but Madness from the Mad Mad Makers?!  So get this: ONE Person will Win 23 PRIZES!  Yup, 23 Marvelous prizes ALL will go to Only 1 person! Make sure you enter on rafflecopter for the Grand Prize of 23 gifts going to 1 Grand Prize Winner Here at the Mad Mad Makers blog! OR just scroll down to the bottom of this blog to enter for the Grand Prize on the Rafflecopter widget ;-)


Then be sure to check back in: 
Tomorrow Noon ~ 5 pm CST 
for my Scavenger hunt!

Scavenger Hunt Prize from Looping with Love
Hint: You'll have a chance to search for 8 answers on my blog, my Ravelry Shop, my Facebook Page, my Craftsy Shop, my Pinterest, and my fb group Looping Crazy! for a possible 35 points! The participant with the most points wins 3 Patterns of choice!


Grand Prize from Looping with Love


If you want to win $15 Shop Credit to Looping with Love (good towards any crochet or clay order) PLUS 22 other amazing Grand Prizes, then make sure you Enter the Rafflecopter below!

Friday, August 8, 2014

ppsssttt...Guess What?!

So I've been keeping a HUGE secret from everyone for quite awhile; unless you're personal fb friends with me, then you already know my news by now ;-)

So we're happy to announce that:

My husband came up with the idea of lining our boots up - after all, we live in Texas. So I had to make some baby cowboy/cowgirl neutral boots :-)


Thank you everyone for all your well wishes; we truly appreciate it! 

But some of you may be thinking - what is a Rainbow baby?  Well, a rainbow baby is a healthy, breathing, crying baby a couple has after going through loosing a child.

I don't believe I ever shared our losses with my fans - so here it goes; fair warning now: you May Need Tissues!  We were expecting our 2nd daughter to be due on 12-12-12 ~ How awesome is that due date, huh?!  Unfortunately, our little angel only made it to around 33 weeks of gestation, and I delivered Keira Reese on Oct 30, 2012. After waiting a grueling 19 weeks for the autopsy report, because she was a "special case," it proved my suspicions correct, and that she passed from fetal hypoxia. Which means that she didn't have enough oxygen in her placenta, and she suffocated to death. I know how terrible that is to read, but please know that my family and I are at peace with her passing. Looking back at my situation, and all the signs that were never taken as seriously as they should have been, I know I have a good case of malpractice against the hospital; now whether or not I decide to take that hospital to court is a whole other story, for a different place and time. I find it comforting that I was lucky enough to hold an angel while here on Earth ~ not too many people are able to say that ;-)

Then about a year later, after battling PTSD and finally feeling like myself again, I came out of my crochet hiatus and started designing again. Once I was back in my happy place, I told my hubby that I was ready to start trying again. He wasn't ready yet. But 2 months later he decided he was ready too :-)  Oddly enough, after only 2 months of trying, but not really, we beat my PCOS (infertility) odds and found out we were pregnant :-)  Of coarse we called all of our immediate family to spread the news! One of whom was my late father, who at the time was slowly declining from stage 4 Glioblastoma (a brain tumor). That was the last phone call my father was ever on - hearing that we were pregnant, after loosing our 2nd daughter. Sadly, 3 days after finding out we were pregnant, I started to miscarry at 5 weeks. Still on the tail end of my miscarriage, I drove across country (over 2,000 miles from Central Texas to Massachusetts- during a terrible Nor'easter I may add) to say my final goodbyes to my 52 year old father. I never had the heart to tell my father that I lost the baby after talking to him; but I'm pretty sure he knows now, and is watching over our 4th baby very closely for us.

So unlike most people, I have gone through a lot of tragedies in my life at a young age, more than I'm sure you'd even be interested in reading. That saying that, "what doesn't kill ya, makes ya stronger," is true for sure!  I know that my life experiences have shaped me into the woman that I am today, but I'm certainly looking forward to my rainbow!

Everybody wants happiness,
 no one wants pain; 
but you can't have a rainbow,
 without a little rain. 

My beautiful daughter is talking to her sibling to come soon :-)

Wednesday, July 30, 2014

New Pattern Giveaway!

I'm releasing a new blanket, and thought my follow hookers would LOVE a chance at winning a free copy of the pattern before it's released!  So I will gift 3 lucky winners a free copy of my new Wild Fan Blanket to their Ravelry username :-)


Need a last minute baby shower gift? Or want to whip out a few Christmas presents over the weekend? Then this is the Perfect blanket for you!  This is an Advanced Beginner pattern, and works up super quick! The pattern is sized for a finished blanket approx. 24" x 34", but I include the beginning chain multiple if you'd like to make the blanket larger ;-)


For this pattern you'll need:

  • Size K (6.50 mm) crochet hook, or hook size to obtain gauge
  • Approx. 3.5 oz of WWY of color A
  • Approx 3.5 oz of WWY of color B
  • Tapestry Needle
  • Scissors

Want to leave me a comment, but don't have a G+, LiveJournal, WordPress, AIM, or OpenID account(s)?? Then just click on the Name/URL or Anonymous options in the dropdown under the comment box ;-)


CONGRATULATIONS TO THE WINNERS!

  • Debbie McLeod
  • Tonya White
  • Kimberly Ingold

I have emailed the winners to the email address they provided to Rafflecopter, so please keep a lookout for an email from looping.with.love@gmail.com :-)  If you don't receive an email from me, then please email me your Ravelry username so I can gift you your free copy of the pattern Wild Fan Blanket.

Thank you to Everyone that participated in my giveaway!  

Because of the great turnout for this pattern release, I decided to have the pattern discounted this week!
Use coupon code: NEWBLANKET at checkout on Ravelry for a discounted price!

I'd LOVE to see your Wild Fan Blanket; so make sure to upload your finished project to Ravelry - then I can add your photos to the pattern listing :-)  Can't wait to see everyone's blankets!!

a Rafflecopter giveaway

Saturday, June 14, 2014

Summer Begins!

Things have been crazy here since school was let out for the summer last week!  My daughter graduated Kindergarten - I can't believe how quick she's growing up!  Anywho....I've had quite a few things "in the works" since my last post.  I played around with clay a bit. My daughter wanted me to make a present for her teacher, so I decided to cover pens and make a few different designs. I think I'm ready to tackle clay covered crochet hook handles now ;-)  Not too bad for my first time making canes, and creating millefori pens!


The bottom 2 went to my daughter's teacher, and my daughter already called dibs on the purple and silver leopard. But my favorite is the 3rd one down from the top. I think I may convert it from a pen into a clay handle for one of my smaller hooks ;-)


I've touched on amigurumi before - and as most of you know, I'm no ami master by any means, BUT I got a special request.  That request was a pair known as: The Joker and Harley Quinn.  After searching pattern libraries, and not finding what I thought was a good fit for their design, I decided to design my own.  At the time I may have bit off more than I could chew - but now I have not 1, but 2 original ami designs :-)  A sneak peak of the dolls right after their faces were painted on. Yes, I hand painted the faces on with fabric paint directly onto the yarn.


Pattern for BOTH of these dolls will be going out to testers soon :-)

Thursday, May 29, 2014

Snappy Tots Giveaway!

Have y'all noticed the Amazing 2 week Extravaganza that Heidi from Snappy Tots has been running?? If you haven't, then you need to go check out her AMAZING Giveaway jammed backed with Incredible vendors!! I was lucky enough to be apart of her awesomeness as well ;-)  So make sure you go get your entries in ~ cause who doesn't like Free Stuff!?!  Oh, by the way: I'm giving away 1 pattern from my Ravelry shop shop to 3 winners :-)

Head on over to Snappy Tots' Happy Birthday Celebration Giveaway now!  Giveaway ends this Saturday, and winners will be announced to vendors on Monday :-)

Friday, May 23, 2014

Patriotic Wavy Wrap

Just in time for this Memorial Day weekend, a NEW pattern!  What could make it any better you ask? Well, I decided to Giveaway 3 FREE copies to fellow hookers ;-)


One of my testers happened to be weaving in some loose ends at the bus stop before sending her son off to school that day. After he Begged her to wear the headband, she decided there was only one solution: make it a Ninja headband! BRILLIANT! Right?  Since I haven't been blessed with a little boy -yet, this Never even crossed my mind!  Just the Wavy Headband can be something that appeals to boys as well as girls. Who would have thought?  I sure am lucky to have some AMAZING testers who think outside the box, and truly are a Great asset to helping me create some fantastic patterns! So this headpiece can be worn by either males or females by just changing where the band goes. A male can use it like a ninja, and wrap it around their head and across their forehead. While a girl can wear it like a traditional tie headband behind their hairline.

Besides thinking "out of the box," my testers take some AMAZING photos! Isn't this little cutie just adorable?!  A BIG THANKS to Donna from Articles of a Domestic Goddess for some Great photos!

Added bonus: this pattern includes 2 headband patterns, as well as 2 star appliques, and a loop flower pattern. This pattern is a 5 for 1 deal, with the possibility to create 18 different headbands due to color variations and choice in style of headband!
This pattern is Full of photo tutorials and a link to how to do a seamless join. With 10 photo tutorials throughout the pattern, it has a total of 33 photos that guide you and showcase each item.
So make sure to get your entries in on Rafflecopter for your chance to win a Free copy of this pattern!  I'll be running the giveaway until Sunday afternoon, so you'll have plenty of time to whip up a few of these for your Monday BBQs ;-)  You can earn 3 entries by simply commenting below this post about the pattern!  Good Luck!
a Rafflecopter giveaway

If you can't wait to find out if you're a winner of a free copy, then take advantage of my sale code on Ravelry to receive $2 Off! At checkout simply type in: MEMORIALDAYPRIDE. Sale will end at May 27, 2014 at 23:59.

I would Love to see your finished headbands! If you’d be so kind, please add your item to the project section on Ravelry or Craftsy. If you love the pattern as much as I do, then please leave your comment about the pattern. Enjoy!

Saturday, May 17, 2014

Thursday, May 15, 2014

0-6 month Some Bunny Loves Me Beanie

We're finally hopping into Spring, and what better way to start off the season but with a FREE pattern! My gift to you this April is a: 

0-6 month Some Bunny Loves Me Beanie


0-6 month Some Bunny Loves Me Beanie


An Original Bunny Beanie
By: Ashley Bower, owner of
Looping with Love
Copyright © Ashley Bower 2014
All Rights Reserved.

Federal copyright law prohibits unauthorized reproduction by any means, and imposes fines up to $25,000 for violation.

This pattern is registered and protected by copyright. All material (including all of the written pattern, photographs, and videos) may not be altered, reproduced, shared, and/or published in print or electronic form without consent from the designer;
Ashley Bower, owner of
Looping with Love.

This material is intended for private use only. Permission to sell and photograph your completed items is granted with this pattern.
  
All techniques and finished sizes are listed in US terminology.


Skill Level: Intermediate


Materials Needed:

Size 6, Super Bulky Yarn: I used Lion Brand Yarn’s Hometown USA
(OR double stranding Worsted Weight Yarn, size 4, will also work)

N (10.00mm) and P (11.5mm) crochet hooks

Scissors

Measuring Tape

Tapestry Needle

Optional: Floral Wire OR Pipe Cleaners (to create bendable ears)

Optional: Contrasting Super Bulky Yarn – size 6 (to create an inner ear, and hide the floral wire)


Abbreviation of Stitches and Special Terms Used:

Ch/Chs: Chain/Chains

Extended Cross-Over Sc: Extended cross-over single crochet: insert your hook into the stitch indicated, yarn over and pull up the loop to equal height of the half double crochet just made in the previous stitch, yarn over and pull through both loops on the hook.

Foundation Dc: Foundation Double Crochet: chain 3, yarn over and insert hook into the 1st chain made, yarn over and pull up loop (3 loops on hook). Yarn over and pull through the first loop on the hook. Yarn over and pull through the first 2 loops on the hook. Yarn over and pull through both loops on hook.

Gauge: what your indicated worked stitches should measure. This pattern measures gauge straight across the middle (diameter) closed circle of a Round. Gauge is given after Rounds 1 and 2. Make sure your stitches worked are riding stitches to obtain correct gauge.

HDC: Half Double Crochet

Invisible Join:  is used to fasten off the last round of an item, and make it appear seamless to the naked eye. If you have never used this stitch, then refer to my tutorial video here:  


MC: Magic Circle

Rnd/Rnds: Round/rounds

Slst: Slip Stitch

St/Sts: Stitch/stitches

[ X ] #x = work that stitch or pattern a multiple of what the # states. Each stitch that is separated by a comma will be worked in the next stitch.

( X ) = final stitch count for that round

YO: Yarn Over


Where to Find Looping with Love:
v  Blog: http://loopingwithlove.blogspot.com/
v Instagram: http://instagram.com/loopingwithlove
 vTwitter: https://twitter.com/LoopingWithLove
v Pinterest: http://www.pinterest.com/LoopingWithLove/


0-6 Month Beanie: With P (11.5mm) Hook:
Measures: 15” in circumference, 5” in length
NOTE:  Beginning chain does Not count as a stitch in the stitch count for the beanie.

Rnd 1: In MC, ch1 and work 12 hdc. Slst in the 1st hdc to join. (12 hdc)

Gauge: 2” in diameter


Rnd 2: Ch1 and hdc in the Next st. Working in the st just skipped; insert your hook into the st, YO and pull up the loop to equal height of the hdc just made, YO and pull through both loops on the hook: first extended cross-over sc completed. [Hdc in the next open unused st, then in the st to the right (which already has a hdc in it) work an extended cross-over sc]10x. In the slst from the previous round work a hdc, then in the st to the right (which already has a hdc in it) work an extended cross-over sc. Slst in the 1st hdc to join. (12 hdc, 12 extended cross-over sc = 24 sts)

Gauge: 4” in diameter

Rnds 3-7: Ch1 and hdc in the Next st. In the st skipped, work an extended cross-over sc. [skip a st, hdc in the next st. In the skipped st, work an extended cross-over sc]11x. Slst in the 1st hdc to join. (12 hdc, 12 extended cross-over sc = 24sts)

Measure of length from the crown to the brim of the hat: approx. 5” long.

Use an Invisible Join to secure the hat, weave in loose ends.


Ears:
Outer Ear (Make 2): With N hook:

Row 1: Ch3 and work 12 foundation dc. Ch 1 and Turn. (12 foundation dc, 3 chs)


Rnd 1: Working on the Wrong Side of the foundation ch: sc in the first 12 sts, work 2sc in the middle of the beginning ch3 from Row 1 (see photo 1), then rotate your work to continue working on the other side of Row 1 and over the beginning tail (see photo 2): sc in the next 12 sts. Rotate the ear again, and slst twice (see photo 3) into the last foundation dc made in Row 1.  Leave a long tail for sewing, and then work 

an Invisible Join in the Ch1 from the end of Row 1. (26 sc, 2 slsts)


NOTE:  If you would rather have ears that bend and/or are able to stick straight up in the air, then you’ll need a small amount of floral wire or pipe cleaners, and contrasting yarn to create an inner ear to attach to the outer ear, and hide the wire.


Inner Ear (Make 2): With N hook and Contrasting Super Bulky Yarn:

Row 1: Ch 3 and 10 foundation dc. Leave a very long tail 15” or more) for sewing and Fasten Off. Weave in the ch tail. (12 foundation dc, 3 chs)

Take your pipe cleaner or floral wire, and measure it out to 10” long and snip off any extra length. Bend your pipe cleaner or floral wire in half, and place it in the middle of the outer ear (see photo below). Then place the inner ear on top of the pipe cleaner/floral wire. So your stitches won’t show through the backside of the ear, I suggest using a mattress stitch in between the outer ear sts and under both top loops of each st of the inner ear.


Attaching Ear Pieces: The ch 3 will automatically curve, that end should be placed towards the top of the ear, and the last foundation dc should be placed at the base of the ear. The wrong side of the inner ear will be facing the right side of the outer ear, so the wrong side of the outer ear will be towards the back of the hat once attached. To avoid the two pieces from moving from where you positioned them, I suggest using stitch markers (lobster claws, bobby pins, safety pins, etc.) at the top and bottom of where the inner ear is to keep it in place. I also suggest using the mattress stitch when attaching the inner ear to the outer ear, to avoid stitching showing on the backside of the ear. Once the base of the inner ear is just above the outer ear’s top loops on the base, start securing the inner ear to the outer ear by sewing through the outer ear’s stitches, and through the inner ear to avoid stitches being noticeable on the backside of the ear.


Attaching Ears to the Hat:  I suggest attaching the ears to the hat while the hat is on a flat surface, like a table.  Find the side creases, and attach the base of the ear to the top of Rnd 2, and to the bottom of Rnd 3 of the beanie.


Enjoy!


Thank you for viewing this pattern by Ashley Bower, owner of Looping with Love!  You may sell any hats made from this pattern, but you may not sell, share, or distribute any or part of this pattern’s written content and/or photos. 
You Must use your Own photos to advertise and sell your items.

When selling your items online, please give credit for the pattern, and link back to Looping with Love at: www.facebook.com/LoopingWithLove

This pattern has been tested to ensure proper fit and gauge. If you notice any mistakes, or have questions or concerns about the pattern, then please feel free to contact me on Facebook, or email me at looping.with.love@gmail.com


Happy Hooking :-)

Looping with Love